1. Growing Cymbidium Seedlings: Flask to Flowering.
Growing Cymbidiums properly, must be one of the easiest and most rewarding hobbies, one could have.
My first Cymbidiums were from a couple of plants in 50 mm tubes, bought some 40 years ago. This was my most rewarding part of the hobby, learning how to grow from a tiny plant to finally flowering it. Over the years with knowledge gained from books and other experienced Cymbidium nursery growers, I refined my ideas to method as described below. As a hobby grower, I found it a very easy and fast growing method.
It is cheap and easy to buy flasks of Cymbidium hybrids in either hobby size flasks; this usually is about 12 to 15 plants, or commercial size, usually about 30 to 40 plants.
Shared among a couple of friends, you could buy several different crosses in hobby size flasks per year.
This would give you a chance to grow maybe something very good and allow you to win on the show bench, also a chance at the champion Cymbidium seedling trophy.
Deflasking Cymbidiums is a very easy method, but if you are not willing to undertake this, most growers / breeders will deflask free. It also makes them happier as often they save expenses of not sending heavy glass jars in packaging and freight.
On arrival, I will plant them straight away into my seedling mix; this consists of Ausgrow mini nuggets of treated pine bark, making sure the nuggets are moist.
One plant each into 48 mm square pots (see figure 1), making sure they are planted with the potting mix about 5 to 10 mm above where the roots form on the base of the plant.
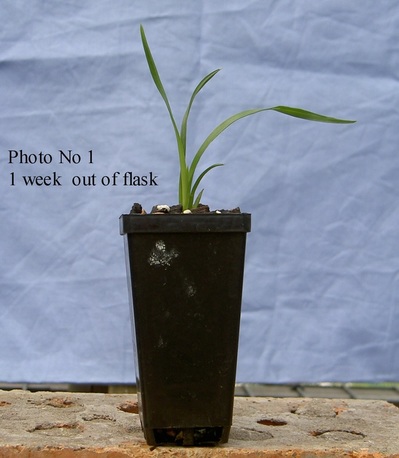
This I found is the start of a valuable lesson, making sure the plant is planted deep enough, so when the new roots appear, they are covered and will grow quickly into the potting mix. If planted at root level or above, often the plants will send out the roots but as the root tips are not covered, they will often never grow. The plant will also be unstable and each bit of breeze will sway it and also hamper the formation of good root system into the potting mix.
This lesson should be remembered at each “Potting On” stage.
I then place the 48 mm tube stock into trays and place under 50% shade cloth. (See photo No.2)
This lesson should be remembered at each “Potting On” stage.
I then place the 48 mm tube stock into trays and place under 50% shade cloth. (See photo No.2)
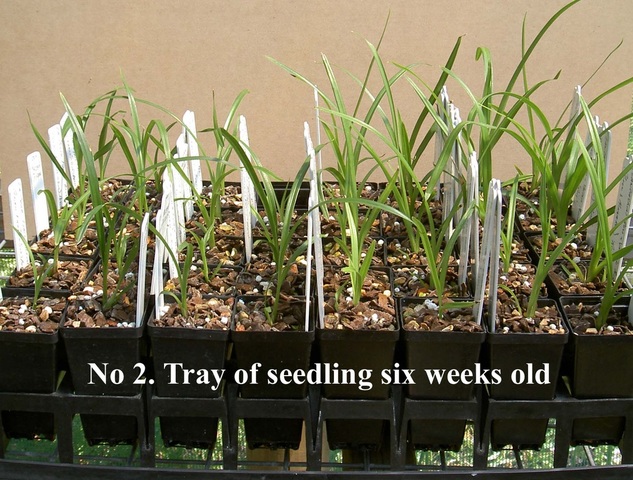
I then give the entire seedling a good flush of water to remove any dust and settle in the plants. I then water the seedlings using a weak dose of organic fertiliser, such as Sea Weed extract, Charlie Carp or a product called Garden Party, a blood by-product treated from the WA Abattoirs.
This I give in a weak dose for the first couple of watering, and then I use at the recommended strength, then about one month after repotting, I switched to my slow release fertilizer, this is the same slower 5/6 months type you can buy from Dot at Grumpys shed, I like to deflask in spring around late September/ October and have all deflasking done before the hot weather approaches
My slow release fertilizer program consist of about 5 to 6 pellets in the 48mm pots about a month after deflasking, then next lot is in or about the first week of January when the plants should be about 6 inches tall or better and can take a bit more fertilizer so I place about 8/10 pellets per pot, and the 3rd fertilizer of my yearly program is on St. Patricks Day I place about 8/10 as well, this should get them right through winter until they need repotting in spring.
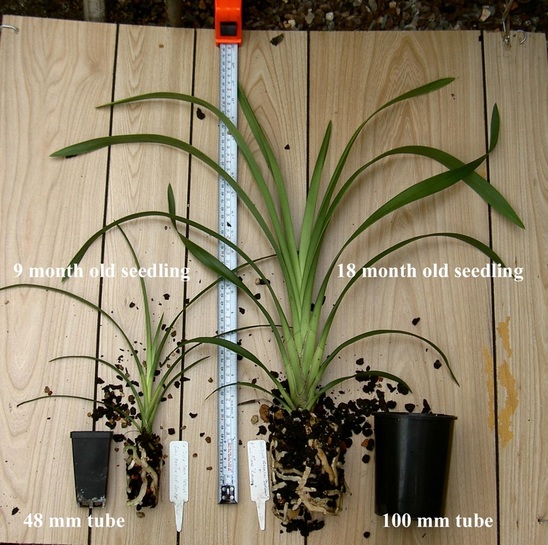
The Cymbidiums will usually remain about 9 to12 months in these 48 mm square pots, by then they should have leaf growth of about 200 mm + long.
The roots should nearly fill the small pots and be well formed, (See small plant on the left in Photo Number 3.)
This I give in a weak dose for the first couple of watering, and then I use at the recommended strength, then about one month after repotting, I switched to my slow release fertilizer, this is the same slower 5/6 months type you can buy from Dot at Grumpys shed, I like to deflask in spring around late September/ October and have all deflasking done before the hot weather approaches
My slow release fertilizer program consist of about 5 to 6 pellets in the 48mm pots about a month after deflasking, then next lot is in or about the first week of January when the plants should be about 6 inches tall or better and can take a bit more fertilizer so I place about 8/10 pellets per pot, and the 3rd fertilizer of my yearly program is on St. Patricks Day I place about 8/10 as well, this should get them right through winter until they need repotting in spring.
The Cymbidiums will usually remain about 9 to12 months in these 48 mm square pots, by then they should have leaf growth of about 200 mm + long.
The roots should nearly fill the small pots and be well formed, (See small plant on the left in Photo Number 3.)
making sure the plant is potted deep enough to cover the bottom of the plant as described above. (Very important, as now this is the stage where the new side shoots will develop and they need to be coming out just below the mix's surface.)
Reason for this is the roots need to be below the mix’s surface, so as the new roots grow out the tips will straight away grow quickly into the potting mix.
At this point many growers go wrong by planting the bottom of bulbous part of the orchid at surface level. If by chance the plant does grow it will soon form a fairly large root system and this will push the plant even higher above the potting mix.
This results in the new growth coming out above the potting mix and grow for a while but as its base is not in contact with the potting mix; its roots will most likely not form properly and grow down into the potting mix, end result is a very poorly grown plant.
After “Potting On”, I “Top Dress” each pot with about a spoonful of pelletised Blood and Bone, Chook manure Mix etc. (Called Organic Life), covering it over with a small amount of potting mix. This should give the plant a good start to growing; I usually apply about 1 teaspoon of our slow release fertilizer to each pot as well. Then give each pot a good flush with water to wash out any dust and helps settle in the plant.
Place in your growing area, mine by now are big and strong enough to be place under the 30% shade cloth.
Now the best part is this pot will allow the plant to grow for about 12 months, by then it should have established its second growth and be well on the way to sending up its third growth, in some cases it maybe already be established.
“Pot On” to the next stage, the 150 mm pot, the space you are going to need will be more than treble to what was required for the 100 mm tubes.
Using the same procedure as described above on the 100 mm pots, “Pot On” into the 150 mm pot. Some of the pots of some clones can be so vigorous that often they can be potted on into 180 or 200mm pots.
The Cymbidiums should be able to be left for a further 12 to 18 months in these pots, most will likely flower in this size pot.
One tip I learnt from experience is when “Potting On”, sit the old part of the growth close to one side of the pot. Having the new lead growth pointing towards the centre of the pot, this way you take advantage of the extra room in front of the new growth.
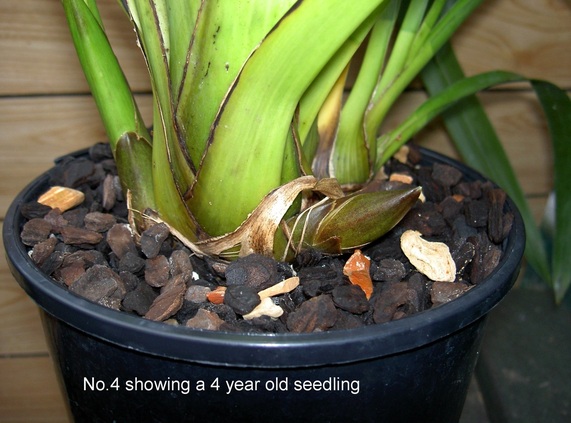
By now, on average three to four years should have passed and most of the Cymbidium crosses if grown well should be in flower. I have had a fair few at three years of age, send up a spike, but the flower count is usually a bit low. (See photo No 4.). A further one to two years is required to produce the best out of the plant.
Reason for this is the roots need to be below the mix’s surface, so as the new roots grow out the tips will straight away grow quickly into the potting mix.
At this point many growers go wrong by planting the bottom of bulbous part of the orchid at surface level. If by chance the plant does grow it will soon form a fairly large root system and this will push the plant even higher above the potting mix.
This results in the new growth coming out above the potting mix and grow for a while but as its base is not in contact with the potting mix; its roots will most likely not form properly and grow down into the potting mix, end result is a very poorly grown plant.
After “Potting On”, I “Top Dress” each pot with about a spoonful of pelletised Blood and Bone, Chook manure Mix etc. (Called Organic Life), covering it over with a small amount of potting mix. This should give the plant a good start to growing; I usually apply about 1 teaspoon of our slow release fertilizer to each pot as well. Then give each pot a good flush with water to wash out any dust and helps settle in the plant.
Place in your growing area, mine by now are big and strong enough to be place under the 30% shade cloth.
Now the best part is this pot will allow the plant to grow for about 12 months, by then it should have established its second growth and be well on the way to sending up its third growth, in some cases it maybe already be established.
“Pot On” to the next stage, the 150 mm pot, the space you are going to need will be more than treble to what was required for the 100 mm tubes.
Using the same procedure as described above on the 100 mm pots, “Pot On” into the 150 mm pot. Some of the pots of some clones can be so vigorous that often they can be potted on into 180 or 200mm pots.
The Cymbidiums should be able to be left for a further 12 to 18 months in these pots, most will likely flower in this size pot.
One tip I learnt from experience is when “Potting On”, sit the old part of the growth close to one side of the pot. Having the new lead growth pointing towards the centre of the pot, this way you take advantage of the extra room in front of the new growth.
By now, on average three to four years should have passed and most of the Cymbidium crosses if grown well should be in flower. I have had a fair few at three years of age, send up a spike, but the flower count is usually a bit low. (See photo No 4.). A further one to two years is required to produce the best out of the plant.
Usually on its first flowering you can get a good guide to its potential quality. If not too hot, you can put it on the club’s sales table.
My bark mix is an open type mix to suit our climate, it may require a bit more frequent watering, but it avoids problems when rainfall and humidity periods are high.
All my Cymbidiums, older than two years of age are growing under 30% shade cloth, open to the sun, rain, and wind.
I hope in some way you may learn a little on how easily it is to grow Cymbidiums, from tiny plants in flasks to flowering size. Give them a go, maybe one day you will be the proud owner of “Champion Cymbidium seedling of the Show”!
Now after all this most will likely say, why not grow them in a community pot.
Well, I did a trial on my first time on de-flasking Cymbidiums, of 15 to 20 plants from each flask.
I placed 50% of the larger Cymbidiums together into a 150 mm community squat pot.
The other 50% smaller Cymbidiums were place into the individual 48 mm square tubes.
All then were placed in the same area and fertilised at the same rate.
After 12 months, the community pot plants were big enough to go into the 100 mm pots. So I decided to break up. The problem was most of the plants had grown well enough, that the roots had filled the pot and had coiled around the inside.
Most would not go into the 100 mm pots because of the big root system, so they had to be potted up into the 150 mm pots. The few remaining seedlings were potted up into the 100 mm pots.
The 50% of the plants that had been grown in the 48 mm square pots were also “Potted On” into the 100 mm pots.
Now at this stage most of the plants were fairly even in their growth.
Twelve months later the rest of the 100 mm pots were potted on into 150 mm pots. Including the seedling from the original 48 mm sq. pots, I had marked them.
The community plants that had been potted into the 100 mm pots were also potted up into the 150 mm pots.
Then I separated them all, and then did a comparison measurement test on all of the 150 mm plants, the original smaller seedlings in the 48 mm square pots were so far advanced it was not funny. They eventually flowered one year before the other seedling from the community pot.
This method I find is to me, much better than the community pot method, as each plant is “Potted On” root disturbance is kept to a minimum. This gave the seedling no setback as the community pot system did.
It seems even seedling Cymbidiums resent root disturbance and sulk for a while before they then return to their normal growing pattern.
Another advantage was that much less space was needed for the first 2 to 3 years.
For me as a hobby grower, the main advantage with the “Potting On” system, is no root disturbance and as many would appreciate, “the space”. About 80 plus of the 100 mm pots would fit into a space of 1 square meter against say 8 to 9 of the 180 mm pots.
I find that Cymbidium plants in general like to be well fed and continuously on the move, growing well. They dislike being disturbed and hate being left for periods without water or good fertilizer. Once they stop growing they take a while to kick start again.
After all the aim is to get the plants to reach the maximum potential growth as quick as possible without a lush soft growth caused by pushing them with a high nitrogen content fertilizer.
Good Growing
Ronald G. Boyd
