2. Growing Sarcochilus falcatus from Flask to Flowering.
GENERAL APPEARANCE:
An epiphytic orchid with large, thick leaves and long sprays, to 18 cm long, with large white scented flowers.
I have always had a fondness for Sarcochilus falcatus, mainly because of its lovely big white flowers and the sweet perfume.
When I started out growing native Sarcochilus orchids, I was told most species were fairly easy to grow, but several species were nearly impossible to grow.
One being falcatus and its different forms, most of the story related it to being short lived.
After several years of not bothering to try growing Sarcochilus falcatus, I was lucky to attend a talk by a group of amateur falcatus growers.
It was pointed out that if grown mounted on suitable mounts, falcatus plants would live to a good age. They would eventually form rather large clumps, returning lovely sprays of flowers in spring.
It was pointed out by some members that they were very difficult to deflask, and then get them to grow to suitable size to attach to mounts.
Most of the growers said they defasked the seedlings straight into treated orchid bark and then it was nearly impossible trying to stop the seedlings roots from rotting off.
Maybe that is why they are not freely available to buy. In fact rarely had I seen them listed in catalogues for sale.
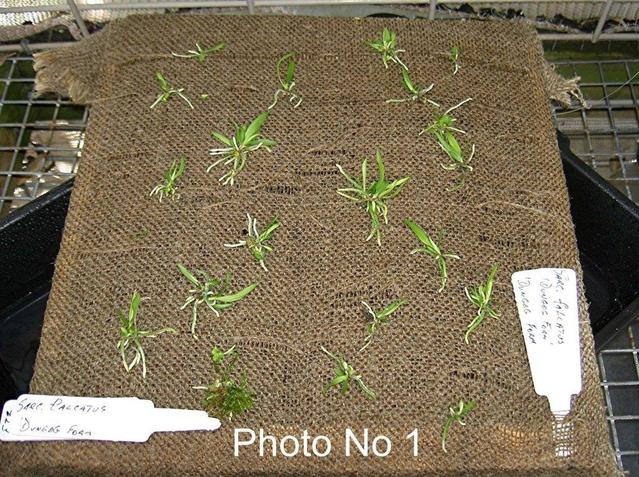
One such method used by one nursery person was to mount the freshly deflasked seedling straight on treated hessian fixed in a suitable frame. (See photo No1).
GENERAL APPEARANCE:
An epiphytic orchid with large, thick leaves and long sprays, to 18 cm long, with large white scented flowers.
I have always had a fondness for Sarcochilus falcatus, mainly because of its lovely big white flowers and the sweet perfume.
When I started out growing native Sarcochilus orchids, I was told most species were fairly easy to grow, but several species were nearly impossible to grow.
One being falcatus and its different forms, most of the story related it to being short lived.
After several years of not bothering to try growing Sarcochilus falcatus, I was lucky to attend a talk by a group of amateur falcatus growers.
It was pointed out that if grown mounted on suitable mounts, falcatus plants would live to a good age. They would eventually form rather large clumps, returning lovely sprays of flowers in spring.
It was pointed out by some members that they were very difficult to deflask, and then get them to grow to suitable size to attach to mounts.
Most of the growers said they defasked the seedlings straight into treated orchid bark and then it was nearly impossible trying to stop the seedlings roots from rotting off.
Maybe that is why they are not freely available to buy. In fact rarely had I seen them listed in catalogues for sale.
One such method used by one nursery person was to mount the freshly deflasked seedling straight on treated hessian fixed in a suitable frame. (See photo No1).
Deflasking:
It is just a simple mater of taking the seedlings from the flask, rinsing off the agar, and then mounting them.
If I need to break the flasks, I use a 5 millimetre thick piece of stainless steel rod about 300 millimetres long. Just place it in the bottom corner of the flask and give it a sharp hit on the end, this usually results in the rod piercing the bottom of the flask. This may need to be repeated several times to break away the glass bottom.
Then the plants can come out easier, but mostly the seedling comes out without the need for this.
Never use the method of wrapping the flasks in cloth and using a hammer to smash the flask, as the impact can lead to severe bruising of the plants roots and leaves, causing the death of the plant!
The freshly bought hessian was first placed in boiling water several times, each time rinsing after being soaked. Final washing was in boiling water with added bleach,
rinsed several times and then hung on a washing line for about a week in the hot summer sunlight.
No soaps or detergents of any type were used; this resulted in a soft fluffy clean hessian sheet.
The Hessian was then cut to size and fixed solidly and stretched firmly to a wooden frame, measuring 300mm by 300 mm, this would be large enough to take the 20 or so plants from the flask.
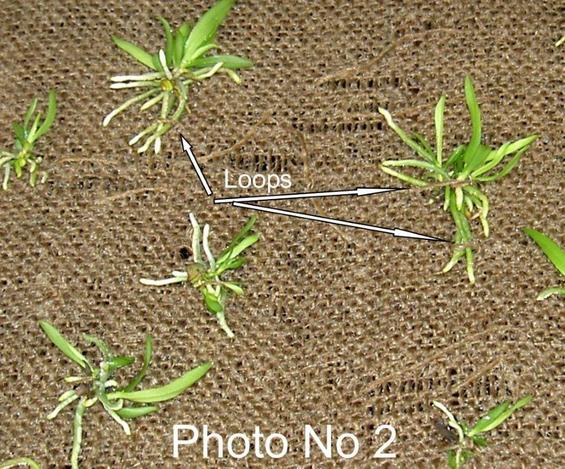
A thread was then cut and lifted, the freshly deflasked falcatus seedling was then placed under the loop and the thread gently pulled tight so to hold seedling firmly.
Or sometimes I pulled a couple of long threads from the hessian, and then using a large sewing needle, I just sewed loops over the plant and its roots. Tighten just soft to firm as to hold the roots against the hessian. (See Photo No.2)
It is just a simple mater of taking the seedlings from the flask, rinsing off the agar, and then mounting them.
If I need to break the flasks, I use a 5 millimetre thick piece of stainless steel rod about 300 millimetres long. Just place it in the bottom corner of the flask and give it a sharp hit on the end, this usually results in the rod piercing the bottom of the flask. This may need to be repeated several times to break away the glass bottom.
Then the plants can come out easier, but mostly the seedling comes out without the need for this.
Never use the method of wrapping the flasks in cloth and using a hammer to smash the flask, as the impact can lead to severe bruising of the plants roots and leaves, causing the death of the plant!
The freshly bought hessian was first placed in boiling water several times, each time rinsing after being soaked. Final washing was in boiling water with added bleach,
rinsed several times and then hung on a washing line for about a week in the hot summer sunlight.
No soaps or detergents of any type were used; this resulted in a soft fluffy clean hessian sheet.
The Hessian was then cut to size and fixed solidly and stretched firmly to a wooden frame, measuring 300mm by 300 mm, this would be large enough to take the 20 or so plants from the flask.
A thread was then cut and lifted, the freshly deflasked falcatus seedling was then placed under the loop and the thread gently pulled tight so to hold seedling firmly.
Or sometimes I pulled a couple of long threads from the hessian, and then using a large sewing needle, I just sewed loops over the plant and its roots. Tighten just soft to firm as to hold the roots against the hessian. (See Photo No.2)
The lot was then watered in with fresh rainwater, and then placed in a shady position with plenty of fresh air movement. During the day they were kept moist by frequent misting.
One test I did was to use a “Kittie Litter Tray”; I filled it to a depth of 10 mm with water and sat the hessian frame with the plants attached on top of the tray.
This gave an extra amount of humidity below the plants and also encouraged some of the roots to grow downwards towards the water.
After one week the seedlings were then watered, every second watering with a weak solution of soluble organic fertiliser.
I do not like to use chemical fertiliser on mounted Australian Native Orchids as I have found the residual salt deposits build up on the roots, often cause the death of the plant.
Within several weeks, the roots started to grow and attach themselves to the hessian.
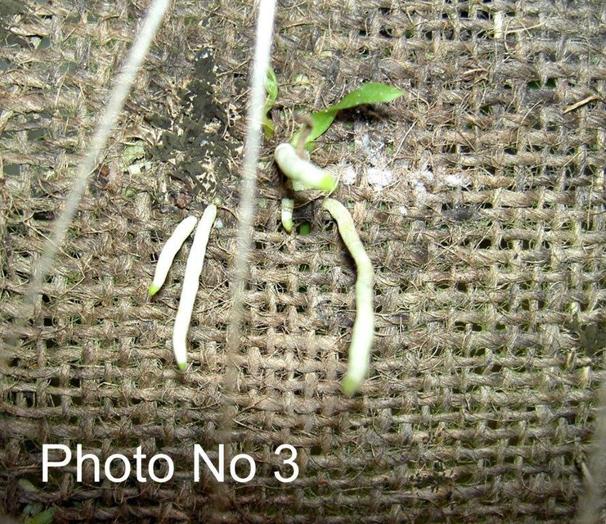
The fluffy natures of the hessian helped the new roots quickly attach themselves to the hessian. Some of the roots grew straight down through the hessian and seem to be doing well just exposed to the shade underneath the frame. After 9 months the roots were growing quiet well. (See photo No 3)
One test I did was to use a “Kittie Litter Tray”; I filled it to a depth of 10 mm with water and sat the hessian frame with the plants attached on top of the tray.
This gave an extra amount of humidity below the plants and also encouraged some of the roots to grow downwards towards the water.
After one week the seedlings were then watered, every second watering with a weak solution of soluble organic fertiliser.
I do not like to use chemical fertiliser on mounted Australian Native Orchids as I have found the residual salt deposits build up on the roots, often cause the death of the plant.
Within several weeks, the roots started to grow and attach themselves to the hessian.
The fluffy natures of the hessian helped the new roots quickly attach themselves to the hessian. Some of the roots grew straight down through the hessian and seem to be doing well just exposed to the shade underneath the frame. After 9 months the roots were growing quiet well. (See photo No 3)
From the flask of the original 20 seedling de-flasked, I lost only 3 of the very small ones.
From some flasks, the loss often is only the runts or very small plants.
The lot were left a whole season to grow to a size were they could be mounted satisfactory and grow on without too much of a problem.
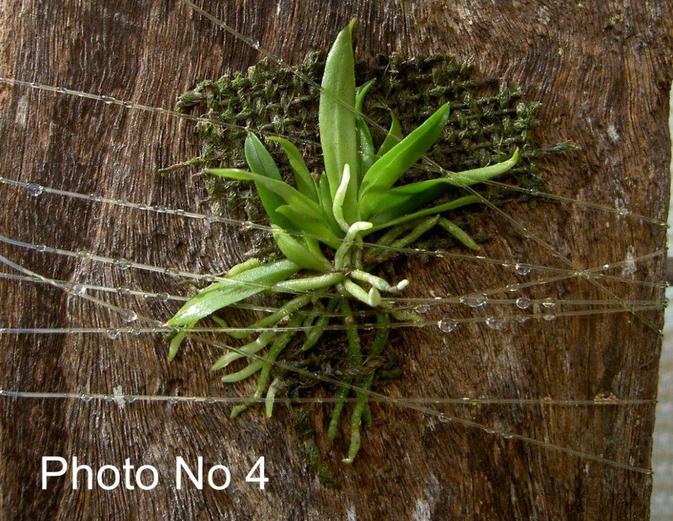
By now the hessian was on a point of rotting away, it was easy to cut the hessian around the plants. They were then mounted and held in place with fishing line being wound continually around the mount and plant covering all the roots and its leaves. (See photograph No. 4)
From some flasks, the loss often is only the runts or very small plants.
The lot were left a whole season to grow to a size were they could be mounted satisfactory and grow on without too much of a problem.
By now the hessian was on a point of rotting away, it was easy to cut the hessian around the plants. They were then mounted and held in place with fishing line being wound continually around the mount and plant covering all the roots and its leaves. (See photograph No. 4)
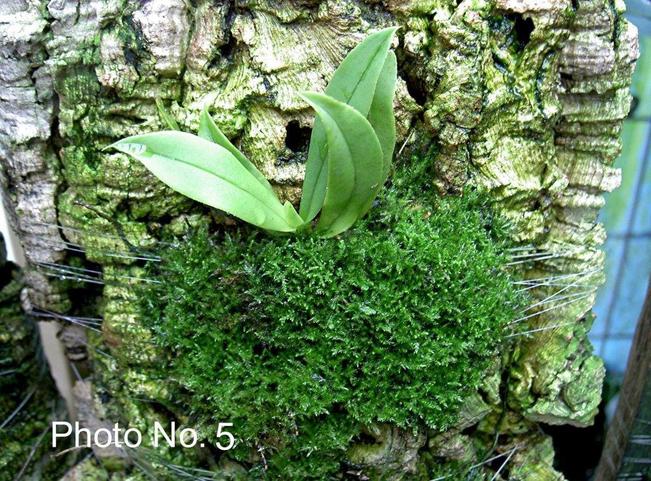
I occasionally use live bush moss to cover the freshly mounted plants root system, this then encourages the roots too quickly establish them selves onto the mount.
Photo No. five (5) shows a well established two year old falcatus seedling using the bush moss.
Photo No. five (5) shows a well established two year old falcatus seedling using the bush moss.
The newly mounted falcatus seedlings quickly threw out new roots that soon attached themselves firmly to the mount used.
Eventually the fishing line could be removed once the falcatus seedling became firmly attached to the mount.
Now looking back on the whole learning exercise of growing falcatus seedling from flasks the obvious previous problems could clearly be seen.
In the wild falcatus grow on branches of trees in gullies and on sides of hills, plenty of fresh air and areas frequently kept moist by mists and rain.
In the wild the tiny seeds would land and only grow in places offering positions of moisture and good germinating, and future growing conditions suitable to this species.
We, as humans like to change their conditions to suit us. We try to get them to change and adapt to growing in pots filled with treated pine bark. This they seem not to like too much, and their way of showing us they do not like such treatment, is to die.
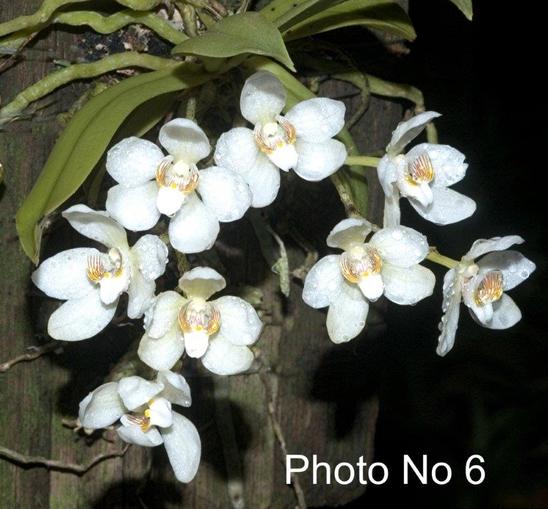
Now with my new found method of growing, I hope I will soon have a lovely collection of mounted Sarcochilus falcatus plants, forming clumps with beautiful bunches of sweetly perfumed white flowers in abundance. (See photo No 6)
Eventually the fishing line could be removed once the falcatus seedling became firmly attached to the mount.
Now looking back on the whole learning exercise of growing falcatus seedling from flasks the obvious previous problems could clearly be seen.
In the wild falcatus grow on branches of trees in gullies and on sides of hills, plenty of fresh air and areas frequently kept moist by mists and rain.
In the wild the tiny seeds would land and only grow in places offering positions of moisture and good germinating, and future growing conditions suitable to this species.
We, as humans like to change their conditions to suit us. We try to get them to change and adapt to growing in pots filled with treated pine bark. This they seem not to like too much, and their way of showing us they do not like such treatment, is to die.
Now with my new found method of growing, I hope I will soon have a lovely collection of mounted Sarcochilus falcatus plants, forming clumps with beautiful bunches of sweetly perfumed white flowers in abundance. (See photo No 6)
I hope to pass on my method of growing Sarcochilus falcatus to you all. It has worked for me so maybe you can give it a try!
Types of mounts preferred are very old, well-weathered fence palings, small branches off Sheoak (Casuarina spp) about 50 to 100 mm thick with bark still intact. Aged bark of the Cork tree (Quercus suber). The rougher the bark surface, the better for the root system to meander through.
With them mounted, they then could be hung in positions favourable to their growing conditions in the wild. Leaving valuable bench space available for other orchids
Fertiliser types:
I particular like to use organic fertilisers like Charlie Carp, Garden Party, Concentrated Seaweed extracts, all I have found to work very well.
I mix at about one half of the recommended strength and use every second watering during the growing season.
Good growing.
Ron Boyd
[email protected]
